Demux
Encoding from a Remux
If you have a remux and you want to create an encode from it, you can encode directly from the remux, and in the muxing stage, copy over the additional tracks that you want, e.g. audio, subs, chapters. However, remuxes usually have HD audio, and encodes typically have lossy audio, so you will need to use eac3to to extract, as well as other tools if you need to transcode.
eac3to
Frequently used switches
-demux will demux the main video track (which is usually the only video track, or the main
feature when PiP is included, or the AVC stream for 3D discs), all audio tracks, all subtitle
tracks, and the chapters (if present). This is generally going to be used every time.
-progressnumbers prints a percentage for progress in the operation. This is mostly just to know
progress, but for those working remotely via SSH, this will fix some output issues.
-core extracts the core DTS track from any of the DTS extensions like DTS-HD MA and DTS-HD HRA.
These are probably the only switches most of you will ever have to use, for more, see here.
eac3to does conversions based on the output file extension, so if your output extension is incorrect, you might not get the result you expect. The only two conversions you should be doing are mono/stereo to FLAC (.flac extension), if using the DTS encoding suite or Dolby Surcode to transcode, you’ll need WAV files for each channel (.wavs extension) If you for some reason want a single WAV file, use the .w64 extension, as .wav has a 4GB limit and .pcm is missing important metadata. Extracting an embedded AC3 track from TrueHD is also done by extension. The combined tracks use .thd+ac3; to get just one of them, just use one of the extensions. I don’t want to go much more into this kind of thing, so if the above link wasn’t helpful, just ask.
NOTE: eac3to cannot extract PGS from matroska if they were compressed with zlib. For all extractions from matroska, the use of mkvextract is strongly encouraged.
Example
In this example, we will be demuxing the EUR BD for Mystic River. WINE users are expected to have set an alias, so all commands will be without the wine prefix.
First, change directories to the directory you want your demuxed files in as you will only be reading from the BDMV folder and unpacking it in the BD root folder is poor practice. If you are using a mounted BD, change directories to where you want to save the output files aswell.
On Windows
eac3to "Z:\MYSTIC_RIVER_EUR"
On Ubuntu or OS X with WINE, you need to use winepath since eac3to doesn’t know what to do with the different style paths.
eac3to "$(winepath -w /mnt/MYSTIC_RIVER_EUR 2>/dev/null)"
Now we need to get a summary of the playlists on this disc.
eac3to "Z:\MYSTIC_RIVER_EUR"
We get this (truncated) output:
1) 00100.mpls, 00027.m2ts, 2:17:57
   - Chapters, 36 chapters
   - VC-1, 1080p24 /1.001 (16:9)
   - DTS Master Audio, English, multi-channel, 48kHz
   - AC3, French, multi-channel, 48kHz
   - AC3, German, multi-channel, 48kHz
   - AC3, Italian, multi-channel, 48kHz
   - AC3, Spanish, multi-channel, 48kHz
   - AC3, Spanish, stereo, 48kHz
   - AC3, Russian, multi-channel, 48kHz
   - AC3, Hungarian, multi-channel, 48kHz

2) 00203.mpls, 00076.m2ts+00077.m2ts+00078.m2ts, 1:51:24
   - Chapters, 12 chapters
   - VC-1, 480p30 /1.001 (4:3)
   - AC3, English, stereo, 48kHz
   - AC3, English, stereo, 48kHz
   - AC3, English, stereo, 48kHz
   - AC3, English, stereo, 48kHz
   - AC3, English, stereo, 48kHz
   - AC3, English, stereo, 48kHz
   - AC3, English, stereo, 48kHz
   - AC3, English, stereo, 48kHz
We want the first playlist in this case, so eac3to "Z:\MYSTIC_RIVER_EUR" 1) -progressnumbers
Now we get this output
M2TS, 1 video track, 8 audio tracks, 17 subtitle tracks, 2:17:57, 24p /1.001
1: Chapters, 36 chapters
2: VC-1, 1080p24 /1.001 (16:9)
3: DTS Master Audio, English, 5.1 channels, 24 bits, 48kHz
   (core: DTS, 5.1 channels, 24 bits, 1509kbps, 48kHz)
4: AC3, French, 5.1 channels, 640kbps, 48kHz, dialnorm: -27dB
5: AC3, German, 5.1 channels, 640kbps, 48kHz, dialnorm: -27dB
6: AC3, Italian, 5.1 channels, 640kbps, 48kHz, dialnorm: -27dB
7: AC3, Spanish, 5.1 channels, 640kbps, 48kHz, dialnorm: -27dB
8: AC3 Surround, Spanish, 2.0 channels, 192kbps, 48kHz, dialnorm: -27dB
9: AC3, Russian, 5.1 channels, 384kbps, 48kHz
10: AC3, Hungarian, 5.1 channels, 640kbps, 48kHz, dialnorm: -27dB
11: Subtitle (PGS), English
12: Subtitle (PGS), French
13: Subtitle (PGS), German
14: Subtitle (PGS), Italian
15: Subtitle (PGS), Italian
16: Subtitle (PGS), Spanish
17: Subtitle (PGS), Dutch
18: Subtitle (PGS), Spanish
19: Subtitle (PGS), Bulgarian
20: Subtitle (PGS), Danish
21: Subtitle (PGS), Finnish
22: Subtitle (PGS), Hebrew
23: Subtitle (PGS), Hungarian
24: Subtitle (PGS), Norwegian
25: Subtitle (PGS), Portuguese
26: Subtitle (PGS), Romanian
27: Subtitle (PGS), Russian
Let’s demux all of our tracks now eac3to "Z:\MYSTIC_RIVER_EUR" 1) -progressnumbers -demux
If we only wanted specific tracks, we can do that too, let’s get the chapters and also the dts core.
eac3to "Z:\MYSTIC_RIVER_EUR" 1) -progressnumbers 1:chapters.txt 3:core.dts -core
If you need to reference a specific playlist, because perhaps you are working on extras or dealing with a special case BD (think Source Code or The Hunger Games), you will need to reference the playlist directly. e.g. (for Windows)
eac3to "Z:\MYSTIC_RIVER_EUR\BDMV\PLAYLISTS\00100.mpls" 1) -progressnumbers -demux
If you are using WINE, you will need to use winepath again.
Transcoding audio
If you are encoding either DTS or Dolby type streams, you will need to get individual WAV files for each channel, using the aforementioned .wavs extension. Each wav will be labeled with the proper channel. As an example:
eac3to input.thd output.wavs
-------------------------------------------------------------------------
TrueHD, 5.1 channels, 48kHz
Decoding with libav/ffmpeg...
Writing WAVs...
Creating file "output.LFE.wav"...
Creating file "output.R.wav"...
Creating file "output.L.wav"...
Creating file "output.SL.wav"...
Creating file "output.C.wav"...
Creating file "output.SR.wav"...
The original audio track has a constant bit depth of 16 bits.
Superfluous zero bytes detected, will be stripped in 2nd pass.
Starting 2nd pass...
Decoding with libav/ffmpeg...
Reducing depth from 24 to 16 bits...
Writing WAVs...
Creating file "output.R.wav"...
Creating file "output.SL.wav"...
Creating file "output.L.wav"...
Creating file "output.LFE.wav"...
Creating file "output.C.wav"...
Creating file "output.SR.wav"...
The processed audio track has a constant bit depth of 16 bits.
eac3to processing took 18 minutes, 57 seconds.
Done.
AAC accepts a single WAV that includes all channels.
eac3to input.ac3 output.wav
DTS-HD Master Audio Suite
The only real thing you need to do is load up the audio tracks. Other than that, set Stream Type to dts. Of course, change channel count as necessary (as well as bitrate).
Just hit the big red ENCODE button. If nothing appears to be happening, try reinstalling Java (encoding fails on my main machine, works in VM, probably because I have lots of other Java stuff running on my machine).
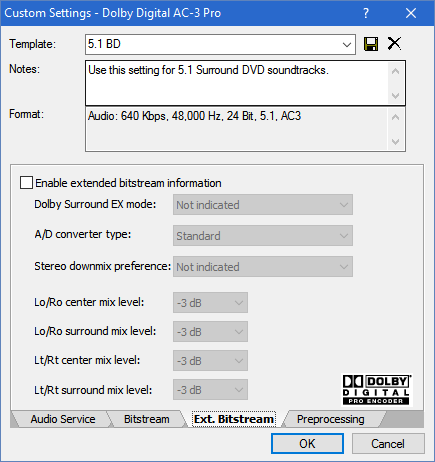
Dolby Digital Surcode Encoder / Sony Sound Forge
The following applies to both encoders: For detailed explanations of the following settings, see official documentation / metadata guide. For the official guide from Dolby, see Standards and Practices for Authoring Dolby Digital and Dolby E Bitstreams and Dolby Digital Professional Encoding Guidelines.
For Dolby Digital Surcode Encoder, the process is pretty much the same as that for DTS-HD Master Audio Suite for loading the WAVs, again changing channel setup as necessary.
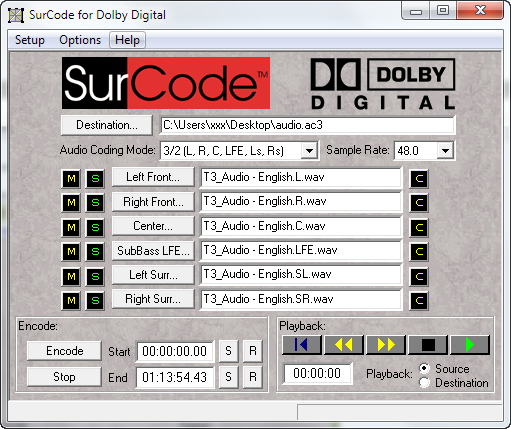
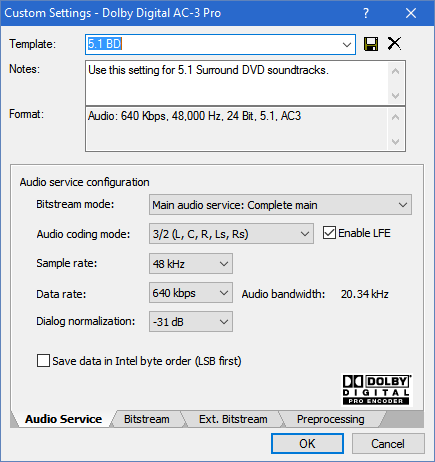
Go to Options > Encode Options and set as below (changing bitrate as necessary; you don’t need 640 for less than 6 channels)
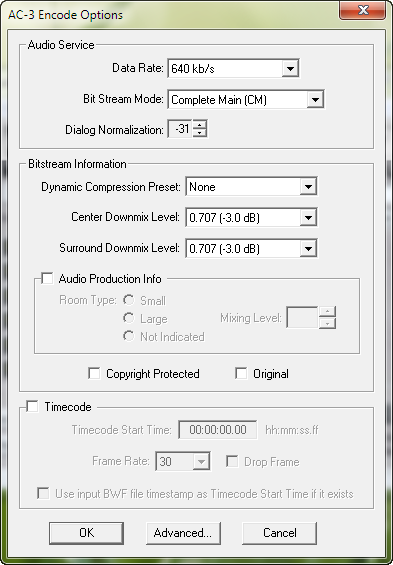
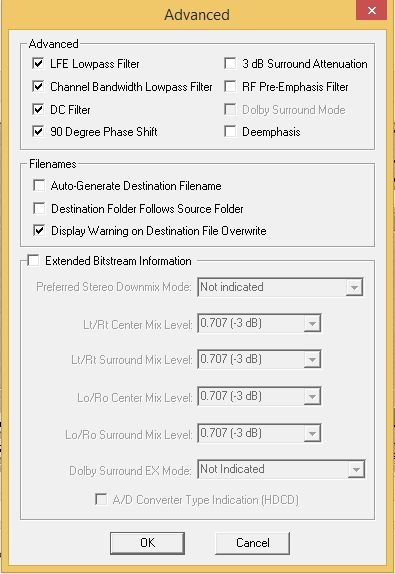
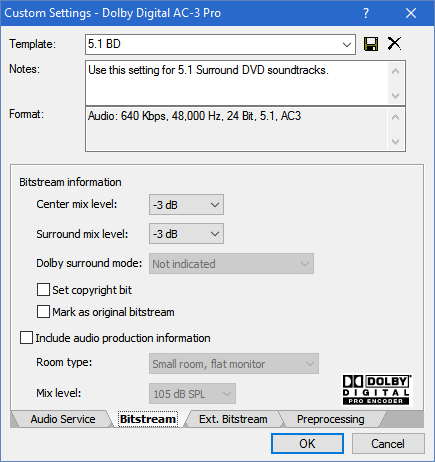
From the Encode Options window, go to Advanced… and set as below
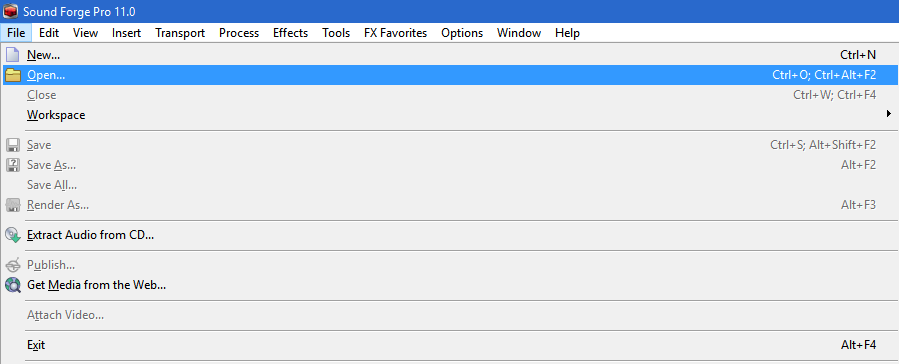
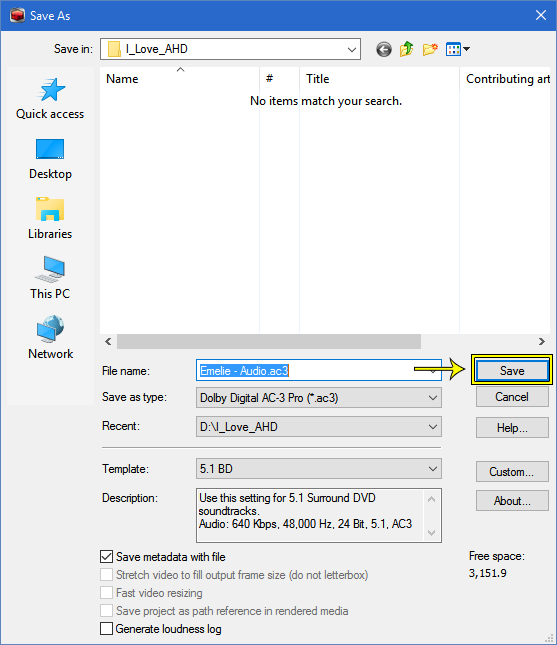
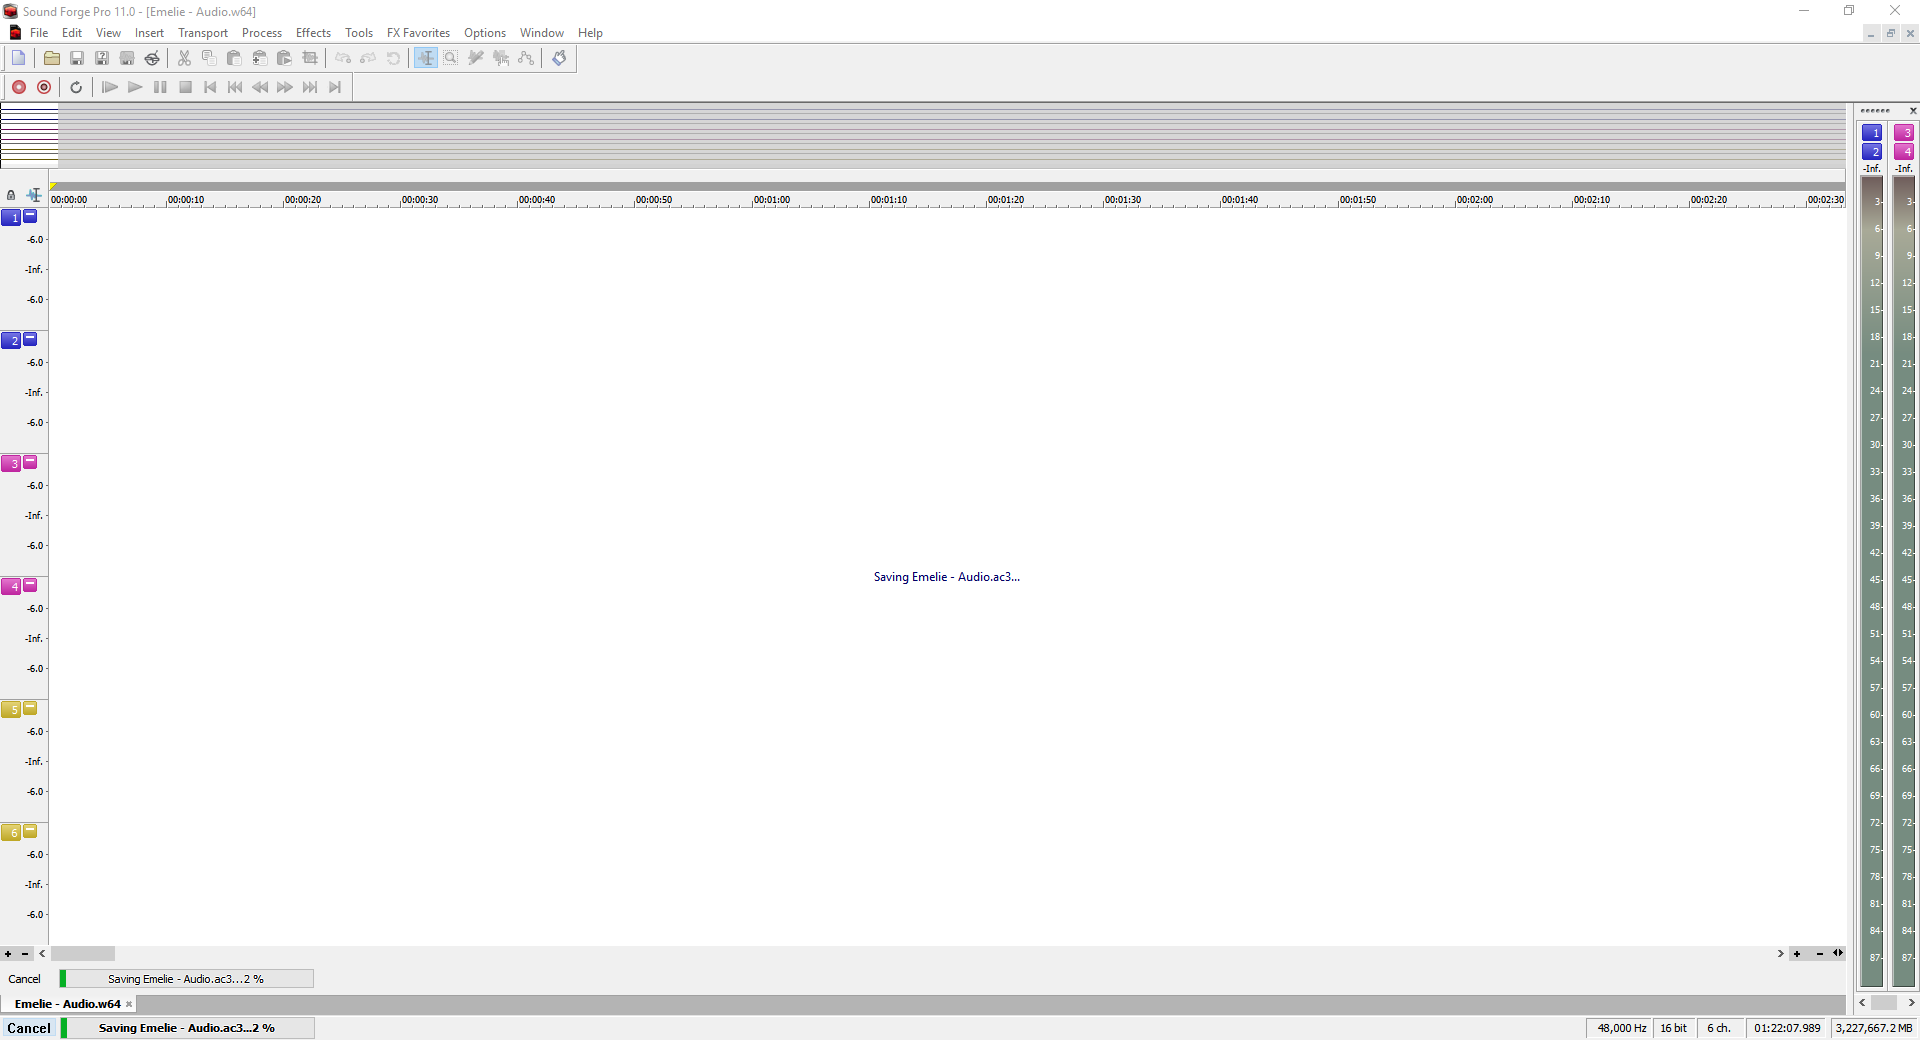
For Sony Sound Forge
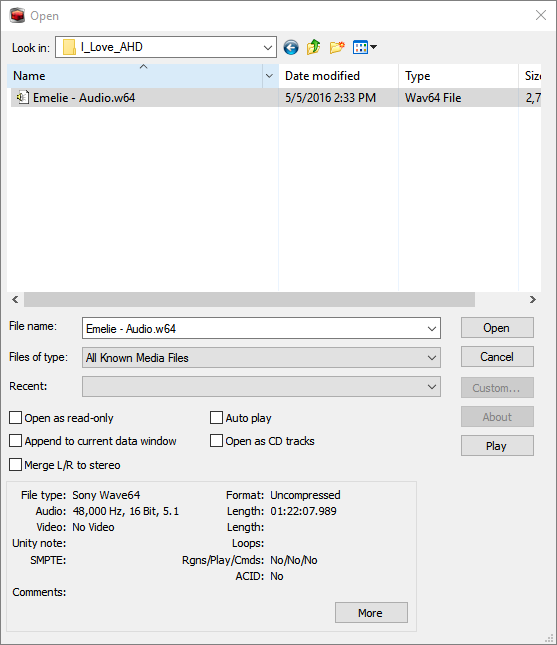
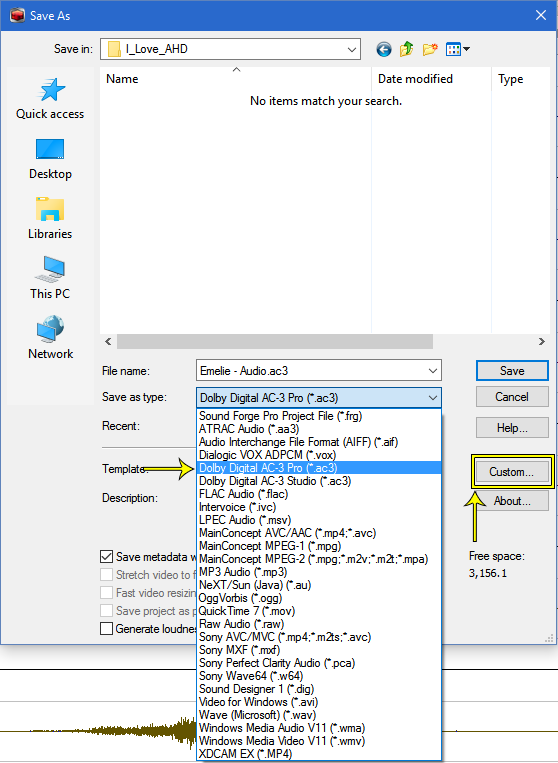
Hidden below are screens provided by radigast that will detail how to set Sound Forge to encode a file. Something to note is the use of .w64 as Sound Forge can auto-detect the channels.
Sound Forge


FLAC
Download here the latest libFLAC version (move libFLAC_dynamic.dll to eac3to folder and rename it to libFLAC.dll). If the original audio is mono or stereo, FLAC is preferred. For more channels, you have to use DTS or AC3 (for compatibility reasons). For personal encodes, do whatever you like, I know FLAC is very popular. As mentioned before, use the .flac extension in eac3to for FLAC conversions.
eac3to input.dtsma output.flac
On 24bit audio you’ll find using the 16bit will save a considerable amount of space with no audible loss of quality. You need SoX for better dithering. Download here. This is a special build of sox that includes libsndfile support, allowing you to work with wave64 without using eac3to.
On macOS, use brew install sox --with-flac --withlibsndfile and any other options you might want.
On Ubuntu or Debian sudo apt --install-suggests install sox will most likely work, but I
haven’t tried it yet.
eac3to input output.w64
sox output.w64 -G -S -b 16 output16.w64 dither -s -f gesemann
-g guards against clipping, -S just shows progress in the terminal window, -b 16 tells it to
convert to a bit depth of 16, -s enables noise shaping and -f gesemann uses the gesemann noise
shaping filter.
AAC
For commentary (you can use -V 63 or less (adjust to ~70 kbps for stereo audio):
eac3to commentary.ac3 stdout.wav | qaac -V 63 -i -o commentary-eng.m4a -
For main audio in 2.0 or 1.0:
eac3to main.flac stdout.wav | qaac -V 127 -i -o main.m4a -
Audio + Res
As a rule of thumb I prefer the chart below. But there might be cases where you want DTS 1509 for 720p or AC3 for 1080p it depends on the encoders preferences.
| Video Res + Audio type | Channels | What to use for the encode |
|---|---|---|
| 1080p main from DTS-HD | 6.1-7.1 | use the 1509kbps DTS core |
| 1080p main from DTS-HD | 5.1 | use the 1509kbps DTS core |
| 1080p main from THD | 5.1-7.1 | make a 1509 5.1 DTS |
| 1080p main from DTS-HD | 1.0-2.0 | make a FLAC 1.0 or 2.0 |
| 1080p main from LPCM | 5.1-7.1 | make a 1509kbps DTS |
| 1080p main from LPCM | 1.0-2.0 | make a FLAC 1.0 or 2.0 |
| 720p main from DTS-HD | 6.1-7.1 | downmix, make a 5.1 AC3 640kbps |
| 720p main from DTS-HD | 5.1 | make a 5.1 AC3 640kbps |
| 720p main from THD | 5.1-7.1 | if the AC3 is 640kbps use it |
| 720p main from DTS-HD | 1.0-2.0 | AAC 1.0 or 2.0 Or FLAC if >640 |
| 720p main from LPCM | 5.1-7.1 | make a 5.1 AC3 640kbps |
| 720p main from LPCM | 1.0-2.0 | AAC 1.0 or 2.0 Or FLAC if >640 |
| commentary | all | transcoding is up to the encoder |
| commentary | 5.1 | if wanted. downmix, AAC ~80kbps |
| commentary | 2.0 | if wanted. AAC ~80-90kbps |
| source is AC3 or DTS | X.X | your source is lossy don’t touch |
Transcoding commentary isn’t a requirement but in cases where you have AC3 2.0 640kbps it might be useful to shave bits. You might also have a musical commentary where transcoding might not make sense. If your 5.1 DTS-HD.MA is close to 1509kbps consider using AC3 If your 5.1 THD is smaller than your 1509kbps DTS consider using AC3
Subtitles and Chapters
OCR SUP to SRT
Remuxes should use SUPs, as it is expected. For an encode it is expected you OCR, or bribe someone to OCR for you, the english subtitles at the very least and preferably every sub that can reasonable be done.
For OCR methods on Windows you can use either Subtitle Edit (download here) or SubExtractor (download here).
For OCR methods on Ubuntu and OS X, read on. Windows users are free to use this method too, they will need to install Python 2.7, tesseract, and download BDSup2Sub++ (rename the exe to bdsup2sub++ if you want the commands to match up with mine below) and put it in your eac3to folder. Also required is the OCR script (find it in the Ubuntu/OS X install section).
I prefer using SubExtractor to OCR and SubEdit to verify the OCR and fix normal mistakes.
You might also consider adding subs from subscene or opensubtitles if they have good reviews or you happen to know someone that can verify them for you, just be sure to verify the timings on playback or modify the timings to the source you have.
Chapter Titles
All remuxes and encodes should have either named or sequentially numbered chapters. You can find chapter titles from various places like Barnes and Nobles, chapterdb, etc. Filling in chapter names by hand is self explanatory.